A Guide for Poster Making: Tips to Master PowerPoint and Inkscape
The end of the semester is fast approaching, meaning many conferences, such as ASPB’s PlantBiology 2026, are on the horizon. These opportunities are a perfect chance to share your results and conclusions with your peers, solicit feedback on your ideas, and develop possible collaborations with others. To make the most of such experiences, it is essential to communicate your ideas through highly polished and professional posters and/or presentations. There is a host of tools and software that exist to make these materials, and spending time to understand them will greatly benefit your future posters. This guide has been developed to introduce two such tools: PowerPoint and Inkscape. Five tips are provided for each program to aid researchers in future poster making. Whether you are a well-established researcher or a grad student who has just started, the instructions provided will help you make a poster that is sure to stand out from the crowd.
PowerPoint:
Tip 1: Basic PowerPoint Navigation
To explain how to navigate PowerPoint (PPT) in order to make complex diagrams, we will use the following terms: Tabs, Menu, Functions. The Tabs are the highest level of organization for tools and functions in PPT. The most useful tabs for making figures and diagrams include Home, Insert, Draw, Design, and View. Two additional tabs that appear when a shape or picture is selected are the Shape Format and Picture Format tabs. Menus are the second level of organization that group several specific tools and functions that belong to a shared theme. For example, the Home tab contains the Drawing menu, which contains the Shapes function that allows you to insert shapes directly.
Tip 2: Using Shapes
You can make complex diagrams and reusable icons by combining basic shapes. Shapes can be inserted into a PPT slide from the Home, Insert, and Shape Format tabs. For example, you can create a pipette icon to use on a poster. It is easiest to use an example image of a pipette as a “goal shape” and then pick the shapes that most closely resemble the parts of the eyedropper.
Some shapes can be adjusted using the yellow circle. Most of the shapes (excluding flowchart shapes) have a yellow circle to adjust curvature and edges. You can use this, for example, to adjust a curved rectangle by sliding the top yellow circle towards the midline of the rectangle. Then you can slide the bottom yellow circle to the corner to generate a right angle.
You can use keyboard shortcuts and a mouse/trackpad to move the shapes into place. Use the built-in auto-snapping feature to move and resize shapes so that they line up edges. However, if you need to finetune shape position, you can zoom in and use the arrow keys on your keyboard to move the shape. The more zoomed in on the shape that is moved, the smaller the increments of movement.
Tip 3: Custom Colors
The eyedropper tool is found in the dropdown menu of the Shape Fill or Shape Outline function. This tool is most useful when you use it to select colors from an imported image or color palette. For example, you can paste a copy of the viridis color palette from the viridis R package. Then select the square shape, click the Shape Fill function, and use the eyedropper to select a hue from the plasma palette.
The eyedropper tool can be used in combination with the More Fill Colors pop-up menu to further adjust the tint (white pigment proportion), tone (grey pigment proportion), shade (black pigment proportion), and transparency (opacity proportion). So, you can select the dark pink color from the plasma palette to fill a triangle shape. Then, with the triangle still selected, you can open the More fill colors pop-up menu to adjust the tint to your final desired color. Additionally, you can adjust the transparency of the selected triangle using the slider of the % box at the bottom of the More Fill Colors pop-up menu. Transparency is great for creating layered effects for shadows, liquids, and complex gradients.
Tip 4: Arranging, Grouping & Pasting
The arrangement of objects is important to your poster design. Several of the arranging functions, including moving objects forward or backwards, can be accessed by right-clicking an object with your mouse. You can also find these functions in the Shape Format tab, the Arrange menu, or the Home tab Drawing menu. Objects can be moved to the front or forward using the Bring Forward function. They can be moved to the back or backwards using the Send Backward function. Pro tip: If you want to mimic the layer navigation of an image-generating software like Photoshop, Illustrator, GIMP, Procreate, or Inkscape, you can navigate to the Shape Format tab, Arrange menu, and select the Selection Pane function to show, lock, and hide individual objects. You will notice that each object you add to a slide will be assigned to its own layer.
 The Group function makes it easier to move, resize, format multiple objects at one time, and keep them together for future use. To group objects, first select the desired objects and then right-click them to find the Group function. You can also find this function in the Shape Format tab, Arrange menu, or in the Home tab Drawing menu under the Arrange function. Grouped objects will act like a vector scaled graphic and resize together. Grouped objects can be copied and pasted together or pasted as an image.
Tip 5: Advanced Shapes Functions
The Edit Shape function is found in the Shape Format tab, in the Insert Shapes menu. Using this function, you can “replace” a shape while keeping the same fill and border colors. You can also “edit points” at any location along the edges of a shape to create a custom shape from any of the inserted shapes. This is a great tool to use if you want to capture the exact morphology of a leaf, for example.
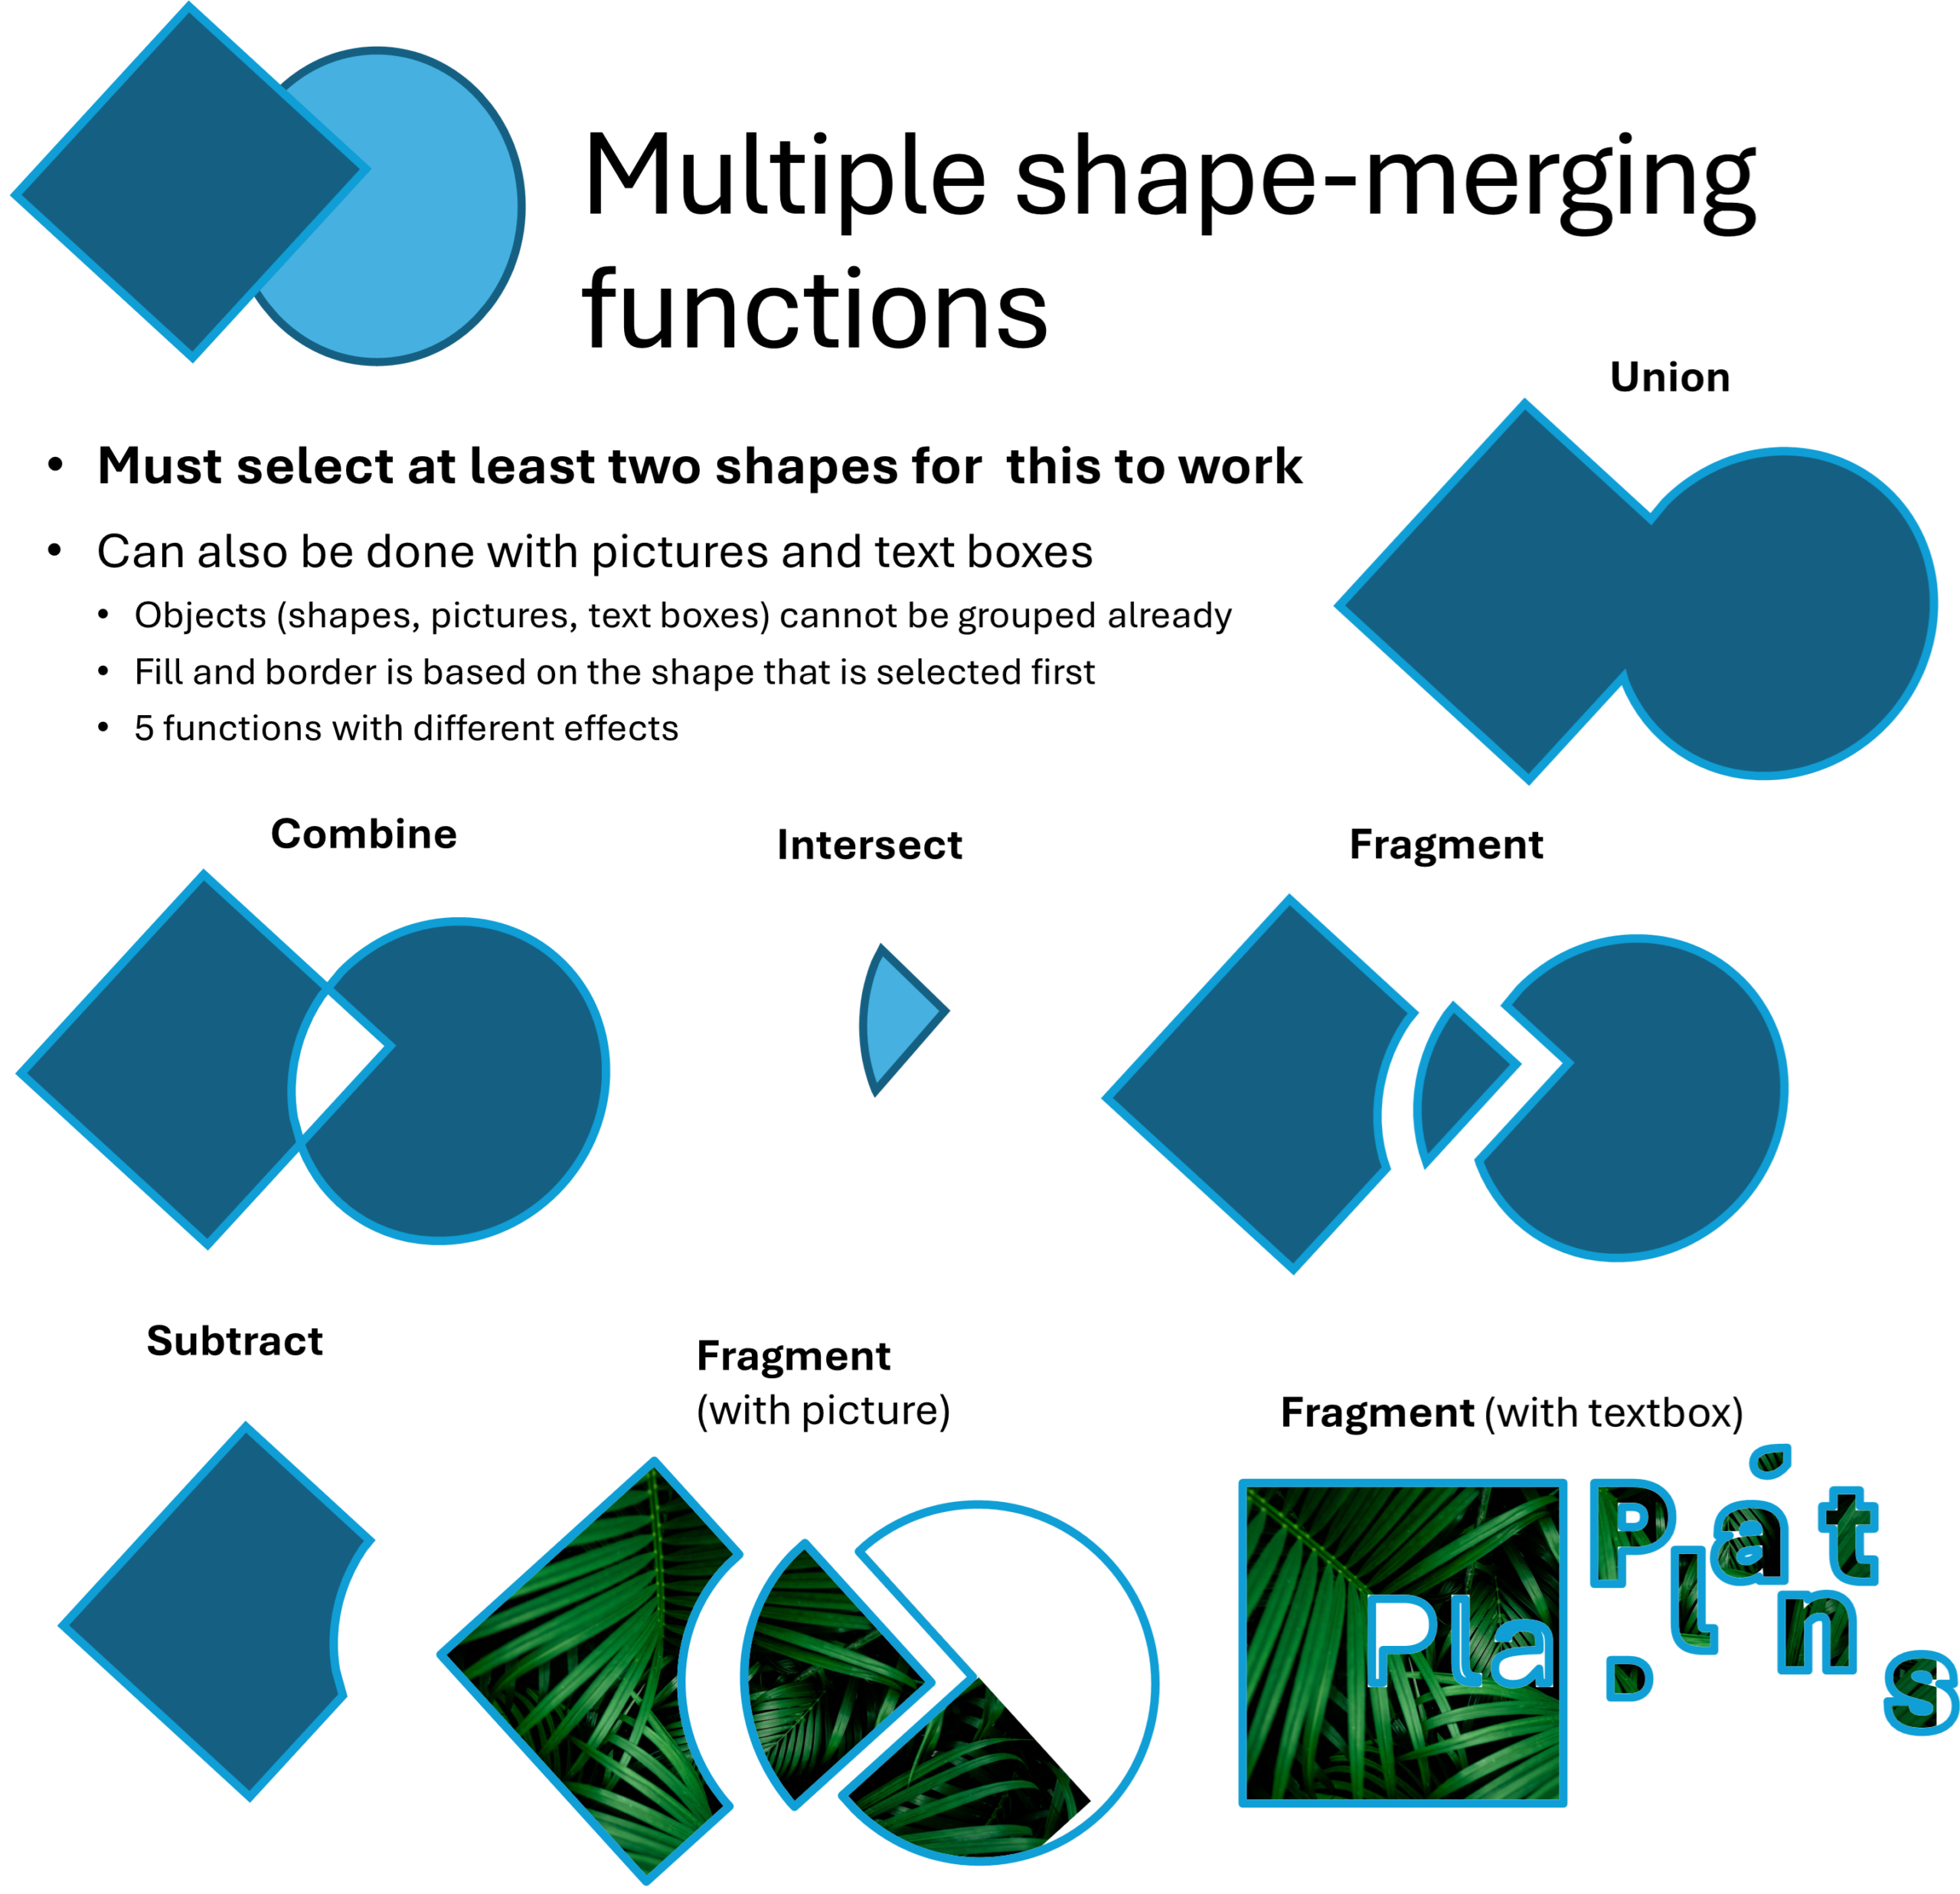
The Merge Shapes function is found in the Insert Shapes menu, under the Shape Format tab and can be used to generate custom shapes from two or more objects. To use this function, you must select at least two shapes. The function also works with pictures and text boxes. You can merge shapes in 5 different ways: “Union”, “Combine”, “Fragment”, “Intersect”, or “Subtract” (Figure 1). For these merge shapes functions, the final output shape(s) share fill and border color with the shape that was selected first from the arrangement of overlapping original shapes. Keep this in mind when using merge shape merge functions with pictures and text boxes in order to maintain the fill of the picture in the final output. Do not group shapes before using the merge functions, as this will not work.
Inkscape:
Tip 1: Familiarize Yourself with the Layout of Inkscape
Opening Inkscape for the first time may be a daunting experience, as you are surrounded on all four sides of your screen by new information and options. Luckily, Inkscape organizes this information into a logical framework that is shown in Figure 2. A basic description of these regions is provided below. More detailed information can be found online, including official documentation from Inkscape (de Castro Guerra & Inkscape’s Contributors, n.d.; The Inkscape Project, n.d. ).
The main work area is called the canvas. In Figure 2, the Canvas constitutes the gray and white regions near the center. Beyond the Canvas is a host of functions to aid in poster making. This includes the Toolbox, which contains common tools you will use on the left. Above is the Tool Bar, which extends the functionality of your tools by providing more options. There is also the Docking area to the right, which will host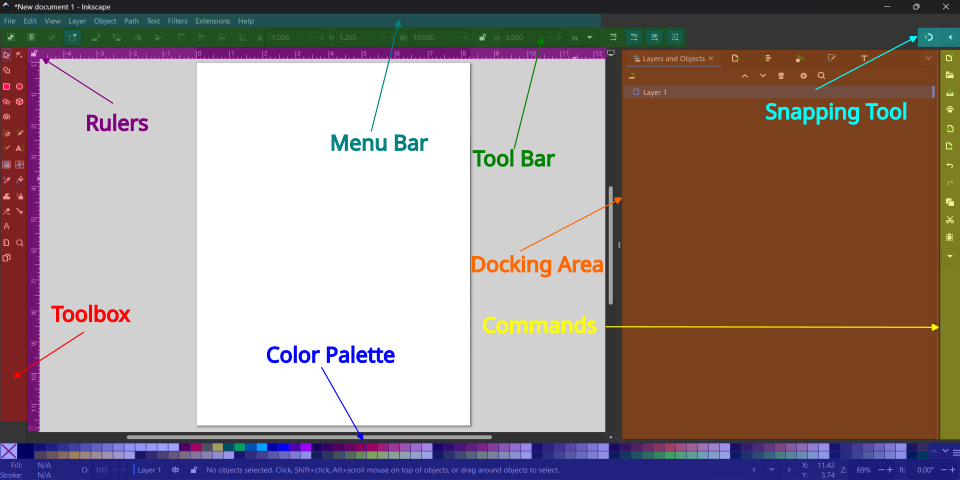 important dialog boxes. The Color Palette is below, and you can use it to easily change the fill and stroke colors of objects and text. The Rulers, which are immediately to the left and above the canvas, can be used to generate guidelines. The Snapping Tool in the top right corner can be toggled on and off, telling Inkscape if you want the objects you grab to “snap” into place, similar to PowerPoint. One region you may be more familiar with includes the Menu Bar, where you can do several common tasks, including saving the document or changing your canvas size to match the dimensions of your poster. Another of these familiar regions is the Command Bar, which contains common commands, such as “undo” and “redo”.
Tip 2: Effective Use of Layers and Grouping Makes Poster Design Easy
Posters are comprised of many objects, such as text boxes, shapes, figures, and so on, which can be complicated to keep track of. Luckily, Inkscape provides layering and grouping to help you keep track of these items and make it easier to manipulate them. Layers are essentially copies of a canvas stacked on top of each other. Each layer can contain its own independent objects, which you can manipulate without changing anything in the other layers. A major benefit of this is that you can lock the layer to prevent accidental selection or editing of parts of the poster you are finished with. Grouping is another important feature in Inkscape. Similar to what is explained in the PowerPoint section, grouping multiple independent objects together means you will be able to handle them all as one object, which makes it easier to move your figures and graphics, copy or duplicate them, and resize them. An added benefit of Inkscape when handling groups is that it is easy to go inside groups to make quick edits without ungrouping the object.
Tip 3: Use SVG Files to Make Professional Looking Posters
Although Inkscape can handle most image formats, you should use scalable vector format (SVG) whenever possible. The SVG format, as opposed to others like PNG or JPG, are infinitely scalable, meaning you will see no distortion or blurring of your images as you change the image size. That means the figure you made to fit in a manuscript, including any you made in PowerPoint, can be easily increased in size to work on a poster with no resolution loss. Additionally, every element of an SVG is editable, meaning that you can change parts of your figures to work with your poster without needing to regenerate it from scratch.
Tip 4: Easily Align Your Poster Using Inkscape’s Built in Tools
Although it may be a headache at times, alignment and spacing are important parts of making a professional looking poster. Luckily, Inkscape provides a host of options to make aligning items easy. One such option is the Snapping Tool. This tool attempts to predict where you want to move an object to and “snaps” it into the predicted space. The arrow next to the Snapping Tool icon provides a menu to change the behavior of this tool to match your needs. Another powerful option is the Align and Distribute dialog box. With this, you can align objects either to each other or to the canvas. To select multiple objects and align them all at once, you can hold the shift key and select them.
Tip 5: Print Your Poster With Confidence
Inkscape provides some ways in which to check the appearance and quality of your poster before printing, allowing you to avoid any need to reprint. For example, if you are curious whether the size of your font or figures is large enough for your poster, Inkscape allows you to visualize them at the same scale you will see once printed. To accomplish this, you simply need to zoom in or out such that the inch marking on Inkscape’s rulers equals one inch with a physical ruler. Just hold a ruler up to your screen and zoom until you reach this point. Once one digital inch is equal to one physical inch, you can see all parts of your poster as it will appear once printed.
______________________________________________
About the Authors
Reed Arneson
Reed is a Ph.D, candidate at the College of Forest Resources and Environmental Science at Michigan Technological University, and a 2026 Plantae Fellow. His research focuses on functional genetics in Populus plants to develop a greater understanding of tree stress response. You can find him X: @Reed_Arneson.
Iris Mollhoff
Iris is part-time Biology and Human Anatomy Instructor at Foothill College and a 2026 Plantae Fellow. Iris is passionate about science education and building supportive learning communities where students can thrive. You can find her on LinkedIn: https://www.linkedin.com/in/iris-mollhoff-201819137/ | Instagram: @iris.mollhoff.

